


How To Remove A Broken Bolt Without Losing Your Mind

Rusted bolts and studs that break when being removed are the worst nightmare of any mechanic, and anyone else trying to fix a machine. Luckily, if you are a handyman who likes to take care of your vehicle in your own garage, there are now a number of options that weren’t available 20 or 30 years ago on how to remove a broken bolt.
When you have a screw head that is stripped or broken off or a bolt that has a stripped or broken off head, it can be impossible to remove without the right tools and the right methods. If you are stuck with a broken bolt inside your car, no need to worry, the maintenance tips below will help you extract the piece of metal without much hassle.
How To Remove A Broken Bolt: Tools You Need
What is the best tool or the best way to remove a broken bolt depends on several factors. Sometimes a hammer or drill will get the job done. Other times, you may also get lucky and have enough room to weld a bolt or nut to the end of the broken bolt or stud. There may be times you’ll need more.
There are times when studs and bolts break in locations where you can’t get a hammer or drill, typically the case with exhaust manifold bolts. In these cases, let’s hope that the extractor or a pair of locking pliers will work, but you’re most likely going to need to remove the part from the vehicle.
If you can’t get pliers, extractors, drills, or hammers into where the stud or bolt is broken, another option is to grind two opposing sides flat so they can be grabbed with a wrench.
Tools needed:
- Hammer
- Drill and drill bit
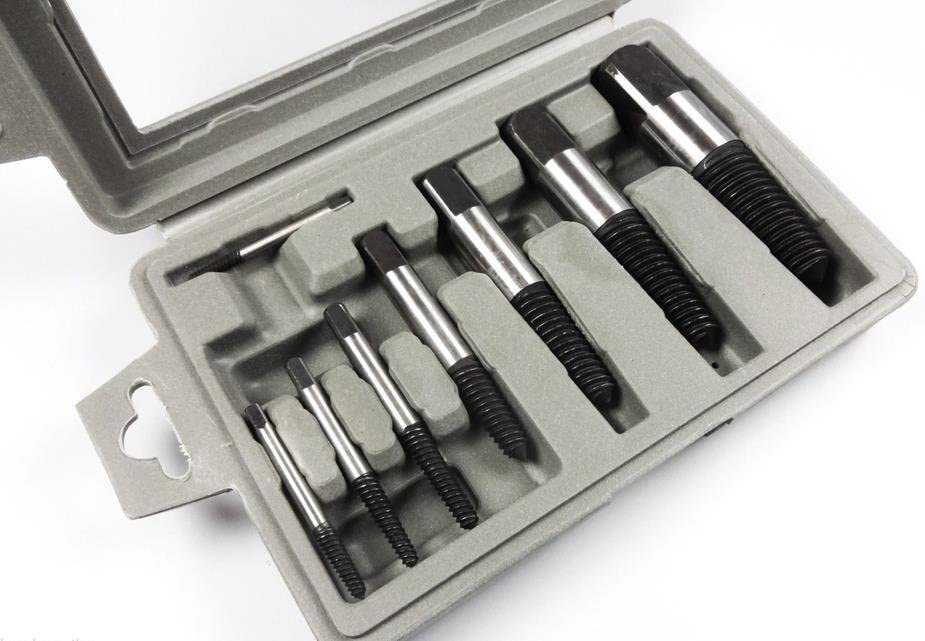
- Screw extractor kit
- T-handle or locking pliers
- Wrench
- Magnet
- Center punch
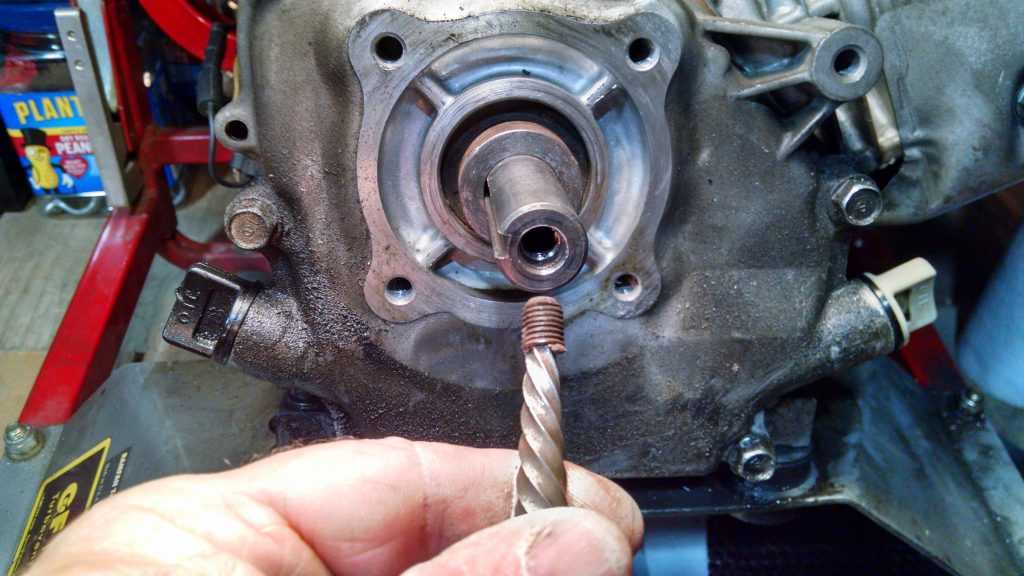
1. The Screw Extractor
Screw extractors come in a range of sizes for screws of diameters ranging from 3/32 inch to upwards of 1/2 inch.
A screw extractor is a high-strength steel shaft with a square head on one end and reverse tapered cutting screw threads on the other end. The square head fits into a T-handle that’s used to turn the extractor. You can also grip and turn the head with locking pliers.
The tapered threads are at the other end of the tool. These are designed to screw backward, or counterclockwise, into the screw or bolt after a pilot hole has first been drilled. The end is tapered so that the extractor digs into the damaged screw deeper and tighter as the extractor is turned. So while you’re turning the extractor counterclockwise, it’s digging into the damaged screw more and more while the damaged screw is backing out.
In the case of a broken stud or bolt with enough of its diameter protruding for the tool to grip it, you can get the job done with a cam-style extractor. Bolt and stud extractors have evolved over the years from the cam-style extractor to multiple piece kits with a tool for each bolt size. Essentially, both work on the principle of using the gripping power created by counterclockwise torque on the tool to grip the broken part with enough force around as much of its diameter as possible to extract it.
The cam-style extractor is used by turning the extractor to open the jaws enough to go onto the broken stud before being hand-tightened. Then a wrench or ratchet and socket are used to apply enough torque to hopefully remove the problem part without breaking it inside the head or block. Remember to use ample penetrating oil in the process.
If you’re dealing with a bolt that breaks too close to grip, use a fluted extractor. This is the method that’s been around the longest.
2. The T-Handle
The T-handle gets its name from its shape. The handle fits over the end of an extractor bit and usually can be tightened with a knurled nut that works like a drill chuck.
T-handles are made to fit a variety of extractor sizes. If you don’t have a T-handle, you can turn a screw extractor with locking pliers.
How To Remove A Broken Bolt With An Extractor
Below are the steps to the best way to remove a broken bolt with an extractor.
1. Marking
First, by using a hammer, mark the center of the broken bolt with a centre punch. Hit it squarely with the hammer to create a starting point for drilling a pilot hole.
Also importantly, it will also reduce the chances of damaging the thread of the broken bolt when you extract it. If the threads on either the bolt or the bolt hole are damaged, it may make bolt removal impossible. Furthermore, if the threading on the bolt hole is damaged, you may be unable to use a new bolt once the old one is extracted.
2. Drill A Pilot Hole
Activate the reverse setting on the drilling machine. A left-handed drill bit would be threaded in the opposite direction. The left-handed drill as it will torque in the opposite direction same as the broken bolt, which will prevent the bolt from being driven in tighter. The left-handed drill will grab and unscrew the tight bolt for you to grab it using a pair of grips, and remove it.
However, we recommend that you use the extracting kit that is suitable for the size of the bolt you want to remove. Drill into the broken stud to the specified depth using the drill bit that corresponds to the extractor size you’ll be using.

Keep the following tips in mind when drilling:
- When drilling, let the drill bit do the work and don’t force it. In addition, use the appropriate speed on your drill for the bit selected.
- Since you’re drilling in metal, keep the drill speed slow and steady. Drilling too fast will overheat the bit and dull it quickly. Using a lubricant or cutting fluid can help speed the drilling process and keep your bit from overheating.
- The pilot hole diameter varies according to the extractor size you are using. Follow the recommendations on the package that came with the extractor.
- Be very careful not to break off the drill bit inside the hole, especially when drilling with small bits.
3. Placing The Appropriate Extracting Bit In The Hole
Depending upon the type of extraction kit you will use for taking out the bolt, the extracting bit would have a left-handed bit at one end and a hex head or T-handle head at another.
Remember, “righty-tighty, lefty-loosey”. Since you would be using a left-handed extractor, insert the extractor into the hole you just drilled by turning it counterclockwise. In addition, since the extractor is tapered; you should first tap it into place with the hammer before choosing the T-Handle or a socket.
4. Remove The Broken Bolt
Once, you continue with the extractor; the tapered end will catch and torque would work to loosen the bolt once the extracting bit is tight. Next, continue turning the extractor counterclockwise with a wrench or ratchet and socket until the broken bolt is removed completely from the surface. Straight and square flute extractors must be hammered into the hole drilled in the stud to remove the stud.
Make sure to time the process to prevent any further damage to the bolt. If the extractor slips and loses its bite in the screw, try to tap the extractor more firmly to get a better bite into the screw. Then, push down more firmly as you turn the extractor counterclockwise. Lastly, enlarge the pilot hole slightly and try again.
5. Removing Metal Fillings
There is a chance that small amounts of metal pieces might come off the bolt during the extraction process. Make sure that you remove the tiny bits if you are looking to replace the bolt with a new one. It can be done easily via compressed air or a powerful magnet.
SEE MORE :
How To Remove A Broken Bolt With A Hammer
Work carefully and slowly if you want to remove a broken bolt with a hammer. Do not go overboard and apply too much force.
Give the part holding the broken bolt a few sharp raps with a hammer. You don’t want to deform the metal but just apply enough vibrating force to break the rust loose. You can use two hammers on parts like exhaust pipe flanges where you can reach two sides of the part at the same time.
Hold one hammer firmly against the part and sharply strike the other side of the part with the other hammer. This helps enhance the force applied with the hammer without deforming the metal.
How To Remove A Broken Bolt With A Heli-Coil
If none of the above methods work, there’s always the last resort: the Heli-Coil. This method replaces the threads after drilling out the broken stud. Heli-Coils may also be a first option when the bolt breaks inside a part: the bolt is not protruding from the part; it’s actually recessed in the part.
Heli-Coils are usually sold as just a handful of the inserts of a single thread size and different lengths and the installation tool. They’re also available with the drill bit for that size as well as kits that also have the right tap.
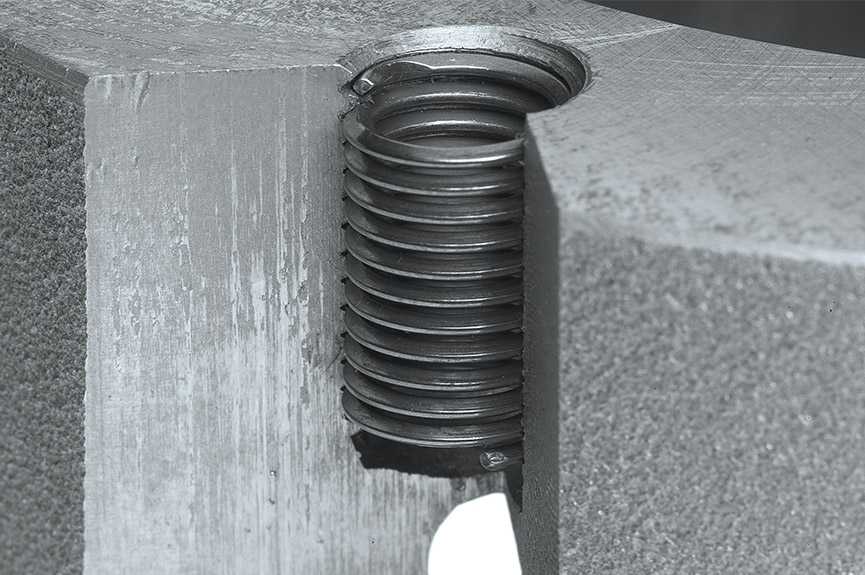
Using Heli-Coils usually requires removing the part to ensure that you drill and thread the “new” hole perfectly straight. You also don’t want any chips entering the engine.
First, drill the broken stud out with the specified bit to the specified depth. Thread this hole to the proper depth using the specified tap. Twist the Heli-Coil insert onto the tool until the tab at the bottom licks into the tool.
Then, thread the insert into the bottom of the hole, giving it one final twist to break the tab at the bottom and remove that tab. The tab is notched at the base to allow it to break easily, but sometimes you may need to convince it with a small punch or screwdriver after removing the insertion tool. The insert must be inserted until about half a thread below the surface of the head and be at least half the depth of the hole.
How To Remove A Broken Bolt: Small Bolts
Most of the methods described above are effective for bolts that are at least 1/4 inch in diameter. Smaller bolts that you have top-down access to can have a slot cut into them with a Dremel and small cutting wheel to allow you to use a screwdriver to remove the offending part.
You have to have clear access to the end of the broken bolt and at least 1/4 inch needs to be protruding to give you enough room to cut into. Otherwise, you will weaken the part in the process to the point that it will break again and worse, inside the part it’s stuck in.