Driving on asphalt always involves one annoying headache, that is stubborn bits of sticky, black road tar stuck to your car’s grills and bumpers. To make it worse, these unsightly splatters are very hard to remove. You won’t be able to wash them off with regular soap, and while many folks use a variety of solvents for the job, it’s very easy to damage your precious car paint if you don’t use the right tar remover and do it the right way.
Read on to learn about the proper solutions for tar remover that are both effective and safe for your paint job and a step-by-step guide on how to do so, a common maintenance job that you would need to perform on your vehicle from time to time.
Contents
What Is Tar and Can It Damage Your Paint Job?
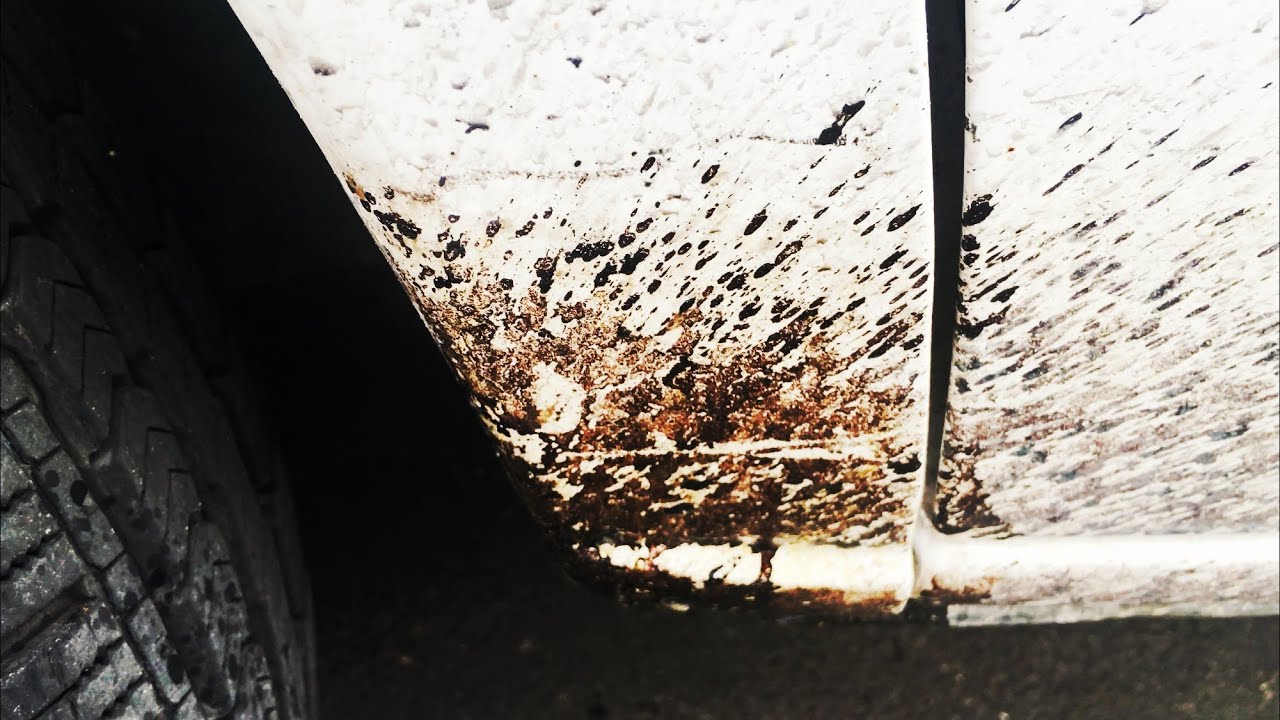
Road tar is essentially an oil-based glue that makes asphalt concrete. These black, sticky splatters are unavoidable when you drive on asphalt roads where the surface starts to deteriorate. The tar gets picked up by your car’s tires and flung onto your paint job.
Unlike mud and bugs that also often end up on your car, tar tends to harden and adhere to your paint, creating a much more stubborn mess. These unsightly splatters cannot be easily removed with just soap and water, and if left on long enough can cause irreversible damage to your expensive paint job.
It’s oil-based nature can make it extremely difficult to remove, so you will need appropriate remover solutions. Also, specifically with road tar, you need to deal with them as soon as you see these black splatters, before they can affect the paint.
How To Remove Tar From Your Car
Use The Right Tar Removers
Tar is a thick, heavy hydrocarbon, so to clean it off, you need to use lighter hydrocarbons like solvents or oils to try thinning it down before scrubbing it off and rinsing off with water. Never use a pure solvent, as they are too strong and you will run the risk of damaging your car’s paint.
While some folks use mineral spirits or other mild solvent like isopropyl alcohol, glycerin, and propylene glycol, these are also not gentle enough. Rubbing alcohol is another common solution many DIYers use for tar removal, but it might not be strong enough and is more suitable for wiping off any remaining tar after you have applied and scrubbed with a proper remover product.
There are many commercial specialized tar remover products out there specifically designed for the job. Specialized bug and work much, much faster than old-school, home-brew removers. The latest non-chlorinated, organic citrus-derived tar removers, which can also remove bugs, are especially effective, some of which start working almost instantly. This type is also safest for you and your car’s paint. You can find them online, at your local auto parts store or even local Walmarts.
Other automotive products that would be effective in removing tar include sticker removers like the gel spray Goo Gone Automotive Goo & Sticker Remover or a lubricator like the WD-40® Smart Straw Multi-Use, used to penetrate and lubricate stuck or jammed parts and protect hard-to-reach components from rust.
READ MORE
- Best Ways To Clean Bugs Off Windshield
- Absolutely Best Car Wash Soaps In 2020
- DIY Car Interior Cleaner Guide
The Steps To Get Tar Off Your Car
The procedures for each type of solvent vary depending on the particular product, so make sure you read the instructions on the package. Generally speaking, the process should look something like this:
Step 1 – Wash your car: Just like when dealing with any type of blemish removal on cars, you must always clean and rinse your car thoroughly to remove dirt and grime, then let your car thoroughly air-dry in a shaded area, especially the tar spots. Any mud or dirt buildup over the tar will soak up and may neutralize the solvent you’re using, making it less effective.
Step 2 – Apply the remover: You’ll either liberally spray the product on, let it soak for a while to penetrate deep into the tar spots. Generally, the longer the better. Just note that before you are tempted to let the removal product soak overnight, do follow the product instructions, as some strong solvents might have a maximum time limit on how long you can leave the remover on without damaging the paint. You’ll know the solvent has started working when you see the tar start melting down in brown rivulets.
Step 3 – Wipe or scrub off the tar: Then apply some of the removal product to a clean rag and gently scrub or wipe the clinging tar off. If this doesn’t remove most of the melted tar, or if the tar doesn’t melt sufficiently, repeat the steps above. If you used a high quality citrus-based remover, you may only need to wipe off the area lightly, and rinse the rest off using your garden hose. If the tar is more stubborn, you might need to scrub a bit, but use a rag and be gentle. When you’re done, just throw the dirty rag away, since you’ll never be able to wash it clean, and it’s a fire hazard.
Step 4 – Wash your car again: Just wash your car again with warm, soapy water after you’re done. Before the final wash, you might want to apply some rubbing alcohol to a clean rag and wipe the tar spots again to make sure no residue is left, just for your peace of mind. For these purposes, rubbing alcohol is very effective and also safe for your paint job.
Once it’s nice and clean, let your car air dry completely. And of course, it’s always recommended to use a good wax to protect your car paint and restore that blinding shine. Since there’s a pretty good chance that your car will be splattered with liquid tar again, some buffing of a good sealant wax will act as an extra layer of protection and will make removing the next tar splatter much quicker.
One thing to note though, if you used solvents or a solvent-based tar remover, this type of remover is quite strong and even after you’ve washed your car, it’s possible the paint or clearcoat in the tar-stained areas is still soft from the chemicals. So if you use a machine polisher for waxing and are too aggressive, you might burn right through the paint. So after using solvents or a solvent-based tar remover, it’s best to hand-polish only.