Back in the days, when you drove in reverse, you had to alternate between looking at your mirrors and straining your neck to check your rear view and blind spot. But thanks to a very handy technology called rear view or backup camera, you can see perfectly what’s behind you with ease. Since they are now mandatory, most newer cars and trucks come with a backup camera already installed. If you own an older model, you can still have one installed by looking around in the aftermarket.
Read on for a step by step guide for beginners on how to install a backup camera on your truck, how much an installation cost, the various types of backup camera plus different mounting options and how they are installed differently, and what to look for when buying and installing a backup camera for your vehicle.
Contents
Backup Cameras Basics
A backup camera essentially gives you an extra set of eyes behind that allows you to maneuver into a tight space, such as when parallel parking. This is especially true If you drive a large vehicle like a truck, van, or SUV with sizable blind spots. If you own a truck and do a lot of towing and install a camera with multiple-angle capability, you may never need another person to help you line up a hitch on the back.
Starting from 2018, all new vehicles are required by law to come installed with backup cameras as standard. Backup cameras attach to the center of the rear of your vehicle and send the footage to a monitor attached to your dashboard, so you can have a clear view of what’s behind you. There are also the unobtrusive in-set screens that replace your rearview mirror when you drive in reverse, but otherwise appear as a regular mirror.
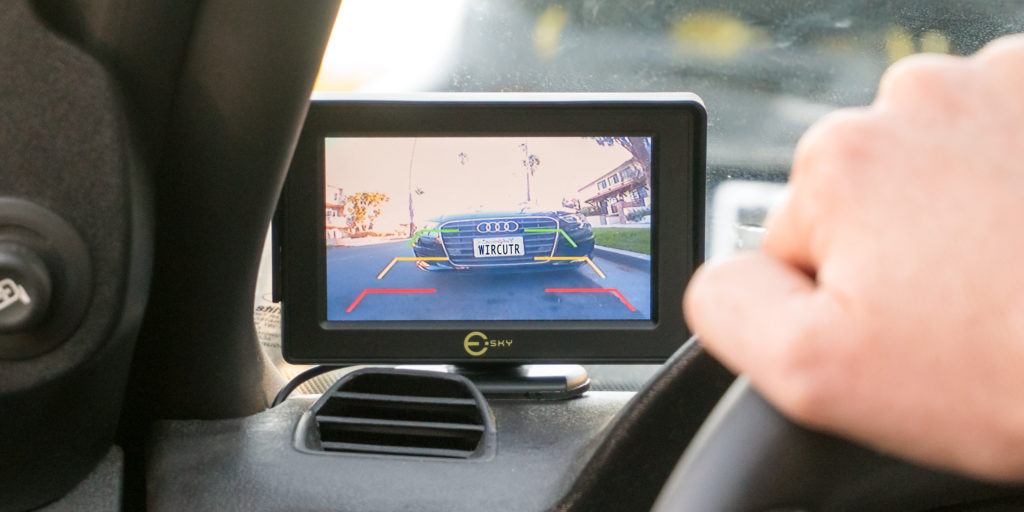
Most backup cameras today will have a grid of coloured lines that appears on the screen so you can see how close you are to surrounding objects in view. Some also come with a sensor that produces a beeping sound when your car gets too close to another object or oncoming pedestrians or vehicles. The basic units give you a simple rear view, while you can opt for those that offer a wide angle.
For larger vehicles with big blind spots, you can even install a set of multiple cameras, so that you get a bird’s-eye view of your surroundings. This means that if you already have a rearview camera, you can always upgrade it to one that provides you more protection, or add additional cameras to the existing system. You can buy backup cameras for your truck at consumer electronics stores or online, like on Amazon. As for installation, the best, most comprehensive backup camera systems are the hardest to install on your own, but you can always seek professional service.
Backup cameras come in wired, wireless and smartphone varieties. A wired connection is most reliable, while a wireless camera is easier to install, and the smartphone type, which is also wireless, will depend on the size of your device to provide a clear view. As for their operation, it’s easy to judge, for instance, the quality of the view and the picture or the coverage or visibility in low light conditions based on their specifications.
How To Install A Backup Camera On Your Truck
Mounting Options
Note that purchasing a unit specifically made for your vehicle’s make and model will make it much easier to install than a standard aftermarket camera. First, you’ll need to decide how to mount it. There are several ways to mount a rear view camera as follow:
- License plate mounts. License plate mount is the most straightforward setup, since the camera can either be attached to the top of your license plate or built into a license plate frame by attaching to your existing license plate bolts. The downside is that this type of mount isn’t very versatile. But it’s worth considering if you’ve decided you want to install your camera yourself but you’re intimidated by the prospect of the job.
- Bracket mounts. While a license place mount is the least versatile option, bracket mounts are the most versatile setup. A bracket mount allows you to fix the camera anywhere on the back of your truck. The downside is you will need to drill into the body of your vehicle, and if you change your mind later on and remove the camera, you’ll have two holes in the body.
- Flush mounts. A flush mount camera is almost identical to a bracket mount, only with a flatter design and the mount is built into the camera to keep as low of a profile as possible.
- OEM mounts. Some truck models are built with rearview cameras as an option. In that case, you can often find a vehicle-specific mount that’s specifically made for your truck, and they should be straightforward to install.
As for mounting the monitor, you can mount it anywhere around your dashboard where you can have the clearest view of the screen. You should also consider an internal monitor that replaces your rear view mirror entirely. An internal backup monitor is a fully functioning rear-view mirror that houses a small screen inside the glass. Most internal monitors shut off when not in use and turn into a regular mirror so your car’s looks will be preserved.
The steps
Most backup camera kits would include everything you need for smooth installation, but a few might not. First, check and purchase the required cables if your kit doesn’t include them. You’ll need camera and monitor splitter cords with connectors for video and power cables, an RCA video cable and 2 bare wire power cables.
Locate where you would mount the camera: How you mount the camera will depend on its design and what works best for you. Follow the manufacturer’s instructions. You will need to drill some holes. To figure out where to drill the hole, hold your camera up to the intended spot. Then, use a marker to mark the spot where the splitting cord sits, and on these marks, drill a hole that’s large enough to fit your camera’s power and video cable. Make sure there are no obstructions between the license plate mount and the rear wiring chamber.
Run the cables: This is the most time-consuming part of the installation and it needs to be performed very carefully following the manufacturer’s instructions. Pull the splitting end of your camera’s video and power cable through the hole you just drilled into the trunk of your car. You can follow your brake light cables all the way to the front of the vehicle. If you’re using a wireless camera, you can ignore this step.
Connect the camera to your reverse light cable: Most backup cameras will automatically engage when the brakes are applied, but this requires them to be wired into the reverse light circuit. These cords look different for every vehicle, so if you’re not sure which is the reverse light, consult your owner’s manual. Reverse light wires hook directly into your vehicle’s tail lights to connect your tail lights to the dashboard, and are normally located in the hatch or trunk of your car.
- Strip and separate your car’s reverse light wires. For safety, make sure you turn your car off first. Using a plier, strip the rubber covering the wires. Then, use a thin tool to poke a hole through the middle of each exposed wire, separating the individual wire strands.
- Fuse your camera wires with the reverse light wires. Attach one of your bare wires to the camera cord’s power connector. Then, poke your bare wires through the center of the exposed reverse light wires. Make sure you poke your positive bare wire (usually red) through the positive reverse light wire and the negative bare wire (usually black) through the negative reverse light wire. Twist them together and wrap them in electrical tape for safety.
Mount the monitor:
- Route your camera’s video cable to the front of the car. Connect your RCA cable to the camera cord’s video connector and run it through your vehicle to the fuse box. You’ll find the fuse box underneath the steering wheel. To do this, you either need to run the video cable through the vehicle’s frame rail, or strip the headliner or side panels and pull your cable through the exposed chamber.
- Route your monitor’s camera cable to the RCA cable. First, route the monitor’s splitter cable to the fuse box. Then, connect the video end of the cable to your camera’s RCA cord and wrap them with electrical tape for safety.
Connect your power source. Sometimes, you just need to plug into your truck’s 12-volt power outlet. If your backup camera comes with collision detection, you’ll need to hardwire the camera directly into your fuse box.
Connect your remaining bare wire cable to the backup monitor’s power cord, then connect your monitor’s power cable to a fuse tap. Plug the fuse tap into the fuse box. Note that you must wire your camera into an ignition-switched fuse to avoid draining the battery overnight.
Mount the camera: Connect your backup camera to its power and video cable, then mount it on the intended spot, for instance fixing it to the front of your license plate following the manufacturer’s included instructions.
Connect any accessories. Many backup camera kits include accessories like a GPS sensor. Usually you need to connect these before testing your camera, but check the product’s instructions.
Put your truck back together. You probably had to remove some trim to run the wires. Assuming everything works as expected, it’s time to reassemble your truck, for instance reattaching your license plate and trim panels. Once you’ve reattached it, give the backup camera firm tugs to make sure it’s firmly secure.
Test the camera. Before turning on and testing your new camera on the roads, test it in your driveway first. Place a large, durable object like a trash bin behind the camera, turn your truck on, see if the camera works and see how distorted the image of the trash bin and the surrounding is. If you’re wired into your reverse light circuit, you can test this by putting your truck in reverse for a moment.
How much does it cost?
The cost simply depends on the equipment you need and the equipment you already have. If your truck already has an in-dash screen, you can spend from $100 to $500 just for the backup camera kit, or even more for larger vehicles or if you opt to install a system consisting of multiple cameras for a comprehensive view. The way automotive backup cameras are offered is that they’re typically sold as camera units that hook to existing screens, individual components, and all-in-one systems.
If your car doesn’t have a screen, of course you’ll need to pay an extra $150-$200 for a screen alone and between $500 to $1,500 for a new head unit with a screen.
As for labor cost, add in an extra $400-$600. If you plan to install your camera on your own, expect to set aside 3 hours for the job, since it involves some drilling, wiring and connection. Before you make your decision, it’s important to remember that wired cameras take longer to install, and the most reliable systems are also the most difficult to install. But it’s well worth the effort, as a good camera system installed properly can provide you with safer driving for up to 10 years.
READ MORE
- Car Safety Features You Want To Get When Buying A Car
- Effective Ways To Resolve The Subaru Backup Camera Issue
Backup Cameras: Other Important Factors to Consider
Types of backup camera
Wired cameras are connected to output screens with wires, which allows for stronger connection, but it also means more complicated installation. You would need professional installation if you’re not extremely familiar with electrical wiring.
Wireless cameras are easy to install since no cables are needed to route the camera to the monitor, but this also means that the connection may be unreliable in bad weather and in large vehicles, as the distance between them is increased.
Smartphone cameras are wireless and use smartphones as displays, making them easier to use but they also have potential connection issues like wireless models. And make sure the screen is large enough so that you can get a clear view without having to squint your eyes. This might be a better option if you already have a camera in place connected to your in-dash screen, and only need some extra help for maneuvering.
What to look for in a backup camera
A camera’s visibility, that is how clear the image captured by the camera is and how well the screen displays the image, decides how much and how well you can see behind a vehicle. Look for a camera with a wide viewing angle and a deep focal length.
The focal length is rated in feet, while the viewing angle is measured by degrees. Higher numbers are better. Typically, viewing angles max out at around 165 to 170 degrees, while angles under 120 degrees would be too narrow.
Another criteria is the clarity of the image, which largely depends on the size of the screen as well as the resolution of both the camera and the screen. Both camera and display resolution are measured in pixels, and the higher the numbers the better.
Another camera specification to look for is the lux rating, which measures performance in low light conditions. The lower the lux rating, the better the camera can see in the dark.
Also, you can opt to see the footage on your dashboard, a mounted screen, or an inset in your rearview mirror. A dashboard or mounted screen will offer a larger image.