


Aiming Headlights: How To Get The Proper Alignment

Proper headlight adjustment is a necessary safety measure because if they are not aligned right, you won’t get the full visibility while driving at night. Besides, misadjusted headlights don’t illuminate the road directly in front of you, causing blinding the eyes of oncoming drivers instead of shining the roads. So, aiming headlights to the right direction is necessary if you want to keep things safe while driving.
Why Headlight Alignment Tilts?
How to adjust headlights? The simple reason is time. Headlights are not meant to be aligned forever, and they slip out even faster if not adjusted every few years. However, a couple of other reasons are in the play too:
- One of the common reasons of misplaced aiming headlights is hauling excess weight in the trunk or cargo area. It pushes down the rear part, causing light beams tilting upward. You can use load-leveling air shocks to fix such an issue.
- Worn shocks can also cause the headlamps to tilt upward direction. You can fix the problem by either replacing the shocks or adjusting headlights to the right direction.
- A front-end collision with another vehicle or something else can tamper with your headlight alignment.
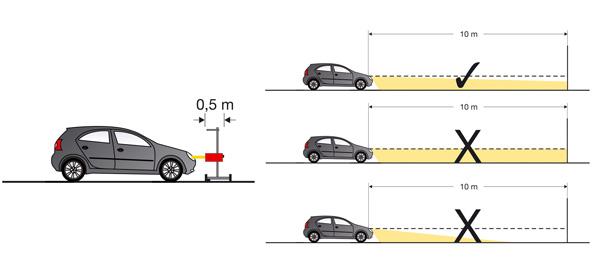 Photo Credit: Hella
How To Determine Incorrect Headline Adjustment?
Level the car. To determine improper headlight adjustment, you have to level the car by properly inflating the tires, keeping the fuel tank at least half-full, and having someone sitting in the driver’s seat. Now, park the car on a flat ground facing toward a wall. The distance between the car and the wall should be 10 to 25 feet, with the car lights directed at the wall. Make sure the shocks are level by pushing all the corners of the car up and down a few times.
Measure the lights. Measure the height between the ground and a fixed point on each of the headlamps with a tape measure. Turn on the lights, and use the tape to mark both the horizontal and vertical centerlines of the headlight beams. The centerlines have to be even. If that’s not the case, lower the higher point to the level of the lower one.
Park the car. Now, park the car exactly 25 feet away from the wall.
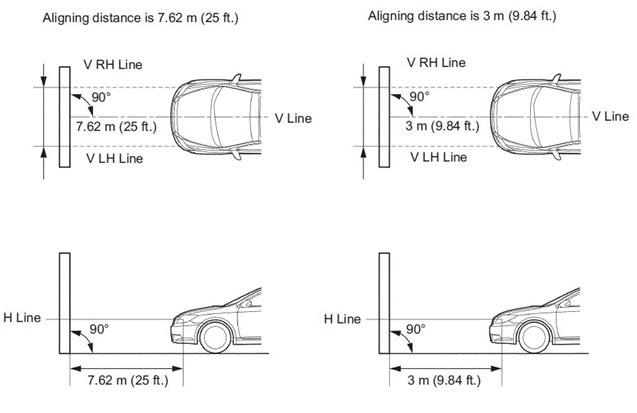
Photo Credit: Complete Vehicle Services
How To Get The Proper Aiming Headlights?
- Find the adjustment screws on your vehicle, which sits on the top and side of the light housing. Adjust the headlights one at a time.
- You can raise or lower the headlamps by turning the screw on the top of each light clockwise and anticlockwise, respectively. Keep turning the screw until the brightest part of the light beam falls directly on or just below the tape line center on the wall.
- Turn the screw on the side for adjusting headlights to left or right direction.
Take a test road drive to find out if the aiming headlights have been done properly. You can repeat the process until you can adjust them to the right position.
Steps To Aim And Adjust Headlights
Adjusting headlights is an easy but often trivial task that takes time to get right. Be patient because every car is different. With some practice and patience, you can learn to do it in a matter of minutes.
How to align headlights yourself in the easiest way? Start doing the alignment at dusk or night. Some vehicles have a bubble vial, like a carpenter’s level, as part of the headlight adjusting setup. This tool will make the job of headlight aiming a lot easier—just make sure your car stand on totally ground level .
Preparation Step: Manual & Tools
Check your vehicle owner’s manual for the location of the headlight to find vertical and horizontal adjusting screws. Note there’s 2 types of screws: adjusting screws and the screws or fasteners that hold the headlights in place. The adjusting screws need to have long shafts; long enough to span the whole vertical or horizontal edges of the headlight buckets.
Step 1: Location
Find a level surface in front of a garage door or wall with over 25 ft of space. This is because when necessary you can back away from the wall in a later step.
Step 2: Measuring & Marking
Use the measuring tape, measure 25 ft from the wall and use the tape to mark the 25-ft line. Colored or white chalk also works.
Step 3: Car Preparation
Park the vehicle close to the wall and turn the headlights on at low beam option.
Step 4: Three Marks
You’ll make three separate markings as below:
- Mark where the horizontal centerlines of low-beams present on the wall
- Mark vertical centerline of each beam on the wall
- Mark the mid line of the vehicle on the wall because it’ll help determine side-to-side alignment later
Step 5: Back Again
Drive back in a straight line so that the vehicle’s front is at the previously marked 25-foot line.
Step 6: Positioning
Check to see if headlights’s brightest spots are two inches below and to the right of the marked horizontal and vertical headlight centerlines. If they’re not, turn the vertical or horizontal adjusting screws or both, as much as needed, for proper headlight adjustment.
And well done! You should have a good understand on how to align headlights properly.