


Brake Glazing Removal Guideline

By Tsukasa Azuma
Last updated May 21, 2018
0 comments
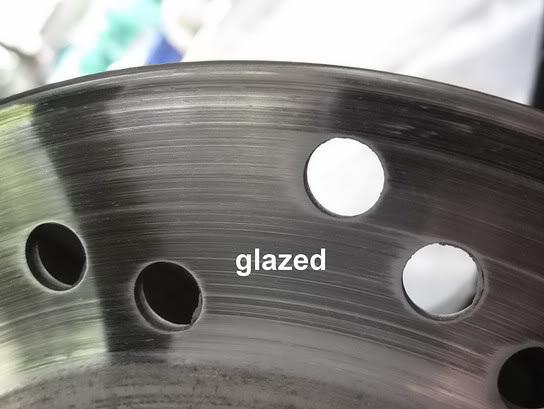
Brake glazing is not that hard only if you know the easy way to do it. To make it clearer to understand, we assume that a brake lathe is not available, for it is not a tool that we usually keep at home. This write-up tells you about the ins and outs of brake glazing removal and helps you save money in the long run.
Step #1: Jack up and secure your car
- Use a floor jack to lift the vehicle up.
- Place the jack appropriately to secure parts of the car.
- Now, slowly lower the jack until the vehicle rests on the stands.
- Then, remove the jack below.
Step #2: Remove the Wheels
- Use an impact gun to remove the lug nuts.
- Pull off the wheel.
Step #3: Remove the Brake Caliper
- Dismantle the caliper pins that holding the caliper from the back.
- Pull the caliper away from the brake pads and the rotor.
- Take a bungee cord and use it to tie the caliper onto a fixed part of metal. This should keep it hanging.
Step #4: Remove the Brake Rotor and Brake Caliper Bracket
- Pull out the brake pads of the bracket.
- There are two bolts on the back portion of the caliper bracket, remove them.
- Pull away the bracket.
- Pull off the brake rotor.
Join our FREE CAR GIVEAWAY Campaign here
Step #5: Resurface the Rotor
- Lay down the rotor on the ground.
- Use an abrasive pad or cookie to slowly roughing up the surface of the rotor.
- The process is complete as soon as your reflection fades away from the rotor.
- Put back the rotor on the hub.
Step #6: Replace the Brake Caliper Bracket and the Rotor
- Place back rotor in its due place on the hub.
- Place back the brake caliper bracket around the hub.
- Use bolt holes to line up the bracket.
- Follow manufacturer’s guideline to place the bolt in the holes.
Step #7: Replace the Brake Pads and Brake Caliper
- Place the brake pads into the bracket.
- Clean and lubricate the side pins on the caliper.
- Follow the manufacturer’s instruction to tighten the caliper pins.
Step #8: Replacing the Vehicles Wheels
- Put back the wheels on the hub.
- Using your fingers tighten the lug nuts to ensure that the wheel is stung properly.
- Torque down the wheels following manufacturer specifications.
Step #9: Lowering the Vehicle
- Now, move the jack stands underneath the vehicle away.
- Lower down the jack until the vehicle touches the ground.
- Double check the torque using a torque wrench.
Step #10: Brandish Rotor and Test Drive
- Pump the brake pedal until it gets firm.
- Go for a test drive.
- Perform several hard stops to brandish the rotor.
- The job is done when the vehicle is operating properly.
Now grab your tools and get to work to perform brake pad glazing.